
I remember the first time I tried to bake something complicated; it resulted in smoke, tears, and a brick-like cake. That’s why I became obsessed with creating zero-fail, maximum-impact recipes, leading directly to this incredibleCreamy No-Bake Oreo Mousse Cups – Easy Chocolate Dessert.
These individual cups are the answer to every dessert emergency. They deliver that deep, rich chocolate satisfaction without ever needing to turn on your oven, making them perfect for scorching summer afternoons or sudden party demands.
- These decadent cups offer a luxurious texture profile, combining the crunch of crushed cookies with airy, velvety smooth chocolate mousse.
- Preparation is genuinely simple, requiring less than 20 minutes of active time and zero oven usage, making it foolproof for beginner cooks.
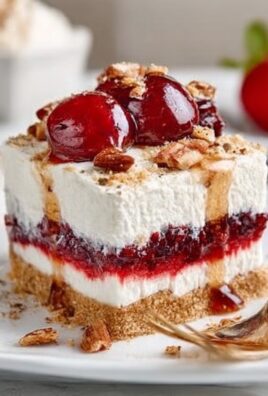
- The dessert is visually stunning when layered in clear glasses, providing an elegant presentation suitable for sophisticated dinner parties or casual gatherings.
- Easily customize this chocolate treat by adding different flavor extracts or topping them with fresh berries or white chocolate shavings for variation.
Ingredients for Creamy No-Bake Oreo Mousse Cups – Easy Chocolate Dessert
Here’s what you’ll need to make this delicious dish:
- Oreo CookiesWe use these for the base and incorporating crushed pieces into the mousse layer for added texture and classic flavor.
- Unsalted ButterEssential for binding the crushed cookies into a stable, pressable crust that holds up well in the refrigerator.
- Cream CheeseMake sure this is softened to room temperature; it provides the rich, tangy backbone necessary for a truly creamy mousse structure.
- Powdered Sugar (Icing Sugar)This sweetens the cream cheese base and dissolves easily, ensuring a silky-smooth texture without graininess.
- Heavy Whipping CreamMust be cold! This is whipped to stiff peaks to create the light, airy volume characteristic of a true mousse.
- Cocoa PowderUse high-quality, unsweetened cocoa powder to achieve that intense, deep chocolate flavor that makes this dessert irresistible.
- Alcohol-Free Vanilla ExtractA splash of quality vanilla enhances the chocolate notes and balances the sweetness of the other components beautifully.
The full ingredients list, including measurements, is provided in the recipe card directly below.
How to Make Creamy No-Bake Oreo Mousse Cups – Easy Chocolate Dessert
Follow these simple steps to prepare this delicious dish:
-
Step 1: Create the Crunchy Cookie Base
Crush about two-thirds of the Oreo cookies into fine crumbs. Mix these crumbs thoroughly with the melted butter until they resemble wet sand. Press a tablespoon or two of this mixture firmly into the bottom of eight individual serving cups or ramekins. Place these cups in the freezer while you prepare the mousse filling.
-
Step 2: Prepare the Cream Cheese Foundation
In a large bowl, use a hand mixer to beat the softened cream cheese until it is smooth and completely lump-free. Incorporate the powdered sugar and alcohol-free vanilla extract, mixing until everything is fully combined and the mixture is light and fluffy. This step creates the stable, flavorful foundation for your mousse.
-
Step 3: Whip the Mousse
In a separate, chilled bowl, whip the cold heavy cream until soft peaks begin to form. Gradually sift in the cocoa powder, continuing to whip until stiff, stable peaks are achieved. This ensures the mousse will hold its shape beautifully and remain light and airy once assembled.
-
Step 4: Combine and Incorporate
Gently fold the chocolate whipped cream into the cream cheese mixture using a rubber spatula. Use an under-and-over motion to avoid deflating the air you just whipped in. Once mostly combined, chop the remaining third of the Oreos into medium chunks and fold them into the mousse for delightful surprises in texture.
-
Step 5: Assemble and Chill the Cups
Spoon or pipe the finished mousse mixture evenly over the chilled cookie bases in the individual cups. If you are aiming for a cleaner presentation, use a piping bag. Once filled, cover the cups loosely with plastic wrap and refrigerate for at least four hours, or preferably overnight, to allow the mousse to set completely.
Transfer to plates and drizzle with sauce for the perfect finishing touch.
The Anatomy of a Perfect No-Bake Dessert
This recipe didn’t just happen; it was born of desperation and a catastrophic heatwave. Picture this: it’s August, my oven is radiating heat like a small sun, and I promised a spectacular dessert for a gathering that evening. Baking was out of the question. I needed pure, unadulterated, chocolatey indulgence delivered with zero effort. That’s when I realized the key to perfect desserts lies not in complicated techniques, but in maximizing texture contrast.
The beauty of theeasy mousse recipeis its simplicity. Unlike traditional cooked custards or soufflés, this version relies on the stability of cream cheese and the aeration of whipped cream. Understanding these two components is crucial. If your cream cheese isn’t soft enough, you’ll end up with tiny, unwelcome lumps floating in your mousse—a texture tragedy. If your whipping cream isn’t cold enough, it won’t hold the air, resulting in a runny puddle instead of a majestic peak. Always keep your mixing bowl and whisk attachment in the freezer for ten minutes before whipping the cream; this makes an enormous difference in achieving the stiffest, airiest peaks possible.
Troubleshooting Common Mousse Mistakes
Even though this is a relatively simple recipe, kitchen mishaps still occur. One of the most common issues people face is a deflated mousse. This often happens when folding the chocolate whipped cream into the cream cheese mixture. It’s tempting to mix vigorously to ensure uniformity, but that aggressive mixing action quickly destroys the delicate air bubbles you worked so hard to incorporate. The goal is to fold just until no streaks of white cream remain, accepting that the resulting mixture will be slightly cloud-like and airy. Think of it as gently combining clouds, not stirring thick paint.
Another frequent question revolves around setting time. Four hours is the bare minimum for the cups to firm up enough to eat neatly, but eight hours, or an overnight rest, yields the best results. During this chilling period, the fat molecules stabilize, and the cream cheese firms up, transforming the airy mixture into a substantial, scoopable mousse. Trying to serve them too soon can lead to a messy, semi-liquid experience, which is disappointing when you’ve mastered the flavor profile. Trust the chill time; patience truly is the secret ingredient here.
To further enhance the intense flavor of this no-bake chocolate dessert, consider blooming your cocoa powder. Before whipping the cream, mix the cocoa powder with a tablespoon of hot water or milk substitute to form a thick paste. Allow this paste to cool slightly, and then fold it directly into the cream cheese mixture instead of sifting the dry powder into the whipped cream. This simple technique deepens the cocoa flavor profile dramatically, removing any hint of bitterness often associated with dry cocoa powder and making the final product richer and more complex.
Creative Twists and Flavor Variations
While the classicCreamy No-Bake Oreo Mousse Cupsare undeniably fantastic, part of the joy of baking—or in this case, not baking—is experimentation. Once you have the core technique down, the possibilities for flavor innovation are endless. These variations allow you to customize this easy chocolate dessert for any season or preference.
Mint Chocolate Chip Mousse Cups
For a refreshing change, incorporate mint extract and a touch of green food coloring (optional, but fun) into the cream cheese mixture. Substitute some of the crushed Oreo pieces with miniature chocolate chips or thin mint cookies if you can find them. The cool mint perfectly complements the dark chocolate base, making it a spectacular treat for warmer weather.
Salted Caramel Swirl
Introduce a dramatic swirl by preparing a thick, luscious caramel sauce and letting it cool slightly. After folding the chocolate whipped cream and cream cheese together, dollop spoonfuls of the caramel throughout the mousse mixture. Do not mix completely; instead, give it one or two gentle swirls with a knife to create ribbons of golden caramel throughout the dark mousse. Top with a sprinkle of flaky sea salt right before serving to elevate the dessert to gourmet status.
Peanut Butter Powerhouse
If you love the chocolate and peanut butter pairing, substitute half of the cream cheese with smooth, creamy peanut butter. You may need to slightly increase the amount of powdered sugar to maintain sweetness, as peanut butter is less sweet than cream cheese. This adds significant density and a nutty richness, transforming the light mousse into a decadent, almost fudge-like confection. Ensure all ingredients are properly incorporated to prevent separation, especially the heavier peanut butter.
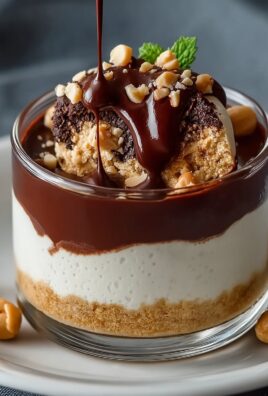
Remember that presentation is key with these individual desserts. Serving them in clear glasses allows guests to appreciate the beautiful contrast between the dark crust and the light, layered mousse. Finish the dessert with elegant toppings like a dusting of extra cocoa powder, a whole Oreo cookie perched on top, or a small dollop of plain whipped cream, adding visual height and textural interest. This easy mousse recipe is designed to impress with minimal effort.
Essential Tips for Successful No-Bake Assembly
Achieving perfection in a no-bake recipe often comes down to managing temperature and timing. Unlike baking where chemistry happens rapidly, no-bake assembly relies on gradual chilling and setting. Here are a few essential tips I’ve learned from countless batches of this simple, yet elegant, chocolate dessert.
- Chill Everything:Ensure all dairy products (heavy cream and cream cheese) are at the temperature specified—very cold for the cream, room temperature for the cheese. This dual temperature strategy guarantees both maximum volume and smooth blending.
- The Power of Piping:If you struggle with getting the mousse evenly into the cups, invest in a simple piping bag and a large round tip. Piping ensures the mousse layers look professional, clean, and prevents smudging the sides of your serving glass, elevating the overall aesthetic of your Oreo dessert cups.
- Crust Thickness:Do not make the cookie crust too thick. A thin, firm layer provides the necessary foundation and crunch without dominating the creamy mousse above it. About half an inch of packed crust is ideal.
- Seal the Flavor:When refrigerating, cover the cups with plastic wrap, pressing the wrap lightly against the surface of the mousse. This prevents the mousse from absorbing any unwanted odors from the refrigerator and maintains the optimal moisture content, avoiding dry edges.
These individual servings are perfect because they control portion size and eliminate the messy slicing associated with traditional pies or cakes. They truly are the definition of an easy chocolate dessert that looks complex. Whether you are hosting a formal dinner or simply satisfying a midnight sugar craving, having this foolproof recipe forOreo mousse cupsin your repertoire is a game-changer. They prove that sometimes the best kitchen achievements require no heat at all—just smart assembly and a bit of refrigeration magic.
Frequently Asked Questions About No-Bake Mousse
Can I make this dessert ahead of time?
Absolutely! This dessert is ideal for making ahead. Because it requires a minimum of four hours to set, preparing it the day before your event is highly recommended. The mousse texture actually improves after 12 to 24 hours of chilling, allowing the flavors to fully meld together beautifully.
What can I use instead of Cream Cheese?
If you need an alternative to cream cheese, you could use mascarpone cheese for a richer, sweeter flavor, or full-fat Greek yogurt that has been strained overnight to remove excess plant-based protein powder, resulting in a thick, stable base. Be aware that these substitutions may slightly alter the final texture and tanginess of the easy mousse recipe.
How long do the Creamy No-Bake Oreo Mousse Cups last?
When stored properly, covered and refrigerated, these Oreo mousse cups will stay fresh and delicious for up to three or four days. Beyond that time, the cookie crust may begin to soften significantly, although the mousse itself will remain safe to eat for slightly longer.
Can I turn this into a full pie instead of cups?
Yes, you can easily adapt this recipe into a full 9-inch no-bake pie. Use all the cookie crust mixture to line a pie plate and increase the chilling time for the entire pie to at least 6 hours, or until the center is completely firm. This creates a stunning centerpiece for any gathering.
What is the difference between mousse and pudding?
The primary difference is the texture achieved through aeration. Pudding is typically a dense, cooked custard thickened with starch. Mousse, like these Oreo dessert cups, is a light, airy mixture achieved by folding in whipped cream or beaten egg whites (though we avoid eggs here for simplicity), giving it a delicate, foamy mouthfeel.
The Quest for Instant Dessert Gratification
We all have those days. You know, the ones where your email inbox looks like a dumpster fire, your socks mysteriously disappeared in the wash, and the only thing that can possibly restore cosmic order is chocolate. But who has time to bake? You need speed, simplicity, and an overwhelming surge of cocoa goodness. This is where the magic happens. We ditch the oven, embrace the refrigerator, and create a dessert so luxurious it tastes like you spent all day fussing over it, even though it took less time than choosing a Netflix movie.
I stumbled upon this recipe during a highly stressful holiday season where I promised 20 people I would bring “something fancy” but had exactly three hours of free time before the party. Panicking, I realized the freezer was my friend. This easy dessert requires minimal effort but delivers maximum impact. It’s rich, airy, crunchy, and the perfect showcase for everyone’s favorite sandwich cookie. Prepare yourself for the ultimate decadent treat that requires zero oven time and will make you the undisputed hero of any gathering.
My kitchen assistant once forgot to chill the bowl, and the cream collapsed. Never forget to chill your mixing bowl and whisk attachment for 15 minutes before whipping the heavy cream.
Gathering Your Dessert Arsenal: Ingredients
The beauty of this recipe lies in its simplicity. You only need a handful of accessible ingredients to create these breathtaking, individually portioned cups. Make sure everything is cold, especially the heavy cream, as that is the secret weapon for achieving that ethereal, cloud-like mousse texture.
Ingredients for the Oreo Crust
- 25 standard chocolate sandwich cookies (Oreo type), finely crushed
- 6 tablespoons (85g) unsalted butter, melted
- 1 tablespoon granulated sugar (optional, for extra stability)
Ingredients for the Mousse Filling
- 8 ounces (226g) full-fat cream cheese, softened
- 1 cup powdered sugar (confectioners’ sugar)
- 1 teaspoon alcohol-free vanilla extract
- 2 cups heavy whipping cream (very cold)
- 1/4 cup cocoa powder (unsweetened)
- 10 standard chocolate sandwich cookies, roughly chopped (for mix-ins)
The No-Bake Master Plan: Step-by-Step Instructions
Step 1: Crushing the Cookie Foundation
First, tackle the cookies. Place the 25 cookies into a zip-top bag and crush them using a rolling pin until they resemble fine, dark sand. Alternatively, a food processor works wonders for this task. Pour the crumbs into a medium bowl and mix them with the melted butter and optional sugar until they are uniformly moistened, similar to wet sand. Press about 2 tablespoons of this mixture firmly into the bottom of 8 small serving cups or ramekins. Place these cups in the freezer while you prepare the glorious filling.
Step 2: Whipping Up the Dreamy Filling
In a large mixing bowl, beat the softened cream cheese until it is smooth and completely free of lumps. Add the powdered sugar and alcohol-free vanilla extract, mixing until just combined and creamy. Set this mixture aside. In a separate, chilled bowl, pour the very cold heavy cream and whip it using a hand mixer or stand mixer fitted with the whisk attachment. Start on low speed, gradually increasing to high until stiff peaks form. This stage is crucial for achieving light, fluffy mousse.
Step 3: Folding and Flavoring
Gently fold the cocoa powder into the cream cheese mixture until the color is uniform. Now comes the moment of truth: incorporate about a third of the whipped cream into the chocolate cream cheese base to lighten it. Then, carefully fold in the remaining whipped cream, ensuring you use a large spatula and cut down the center, turning over the mixture gently. This retains all the air you just whipped in. Finally, fold in the 10 roughly chopped cookies.
Step 4: Assembling the Creamy No-Bake Oreo Mousse Cups – Easy Chocolate Dessert
Remove the crusts from the freezer. Spoon or pipe the finished chocolate mousse mixture over the chilled crusts. Fill each cup completely. If you are feeling extra fancy, use a piping bag and a star tip for a beautiful presentation. Refrigerate the finished cups for at least 4 hours, or ideally overnight, to allow them to set completely. Before serving, garnish with extra cookie crumbs or a whole miniature cookie. These individual servings make hosting effortlessly stylish.
Perfecting the Cooking Process

Since we are dealing with a no-bake recipe, the sequencing focuses entirely on temperature control and mixing technique. Always ensure you chill the whipping cream and bowl thoroughly before whipping, and press the crusts immediately before starting the mousse to guarantee they set quickly and hold their shape.
Add Your Touch
Try swapping the standard chocolate cookies for mint-flavored ones for a festive twist, or incorporate a teaspoon of espresso powder into the mousse filling for a deeper, richer mocha flavor. You could also sprinkle flaky sea salt over the top for an elegant salty-sweet finish that truly elevates this treat.
Storing & Reheating
Store your finished mousse cups covered tightly in the refrigerator for up to five days. Since this is a frozen dessert, reheating is decidedly unnecessary! If frozen, the texture might change slightly, so ensure they thaw in the fridge for about 30 minutes before serving for the best creamy consistency.
Expert Tips for Flawless Mousse
- Do not overmix the mousse once you combine the whipped cream with the cream cheese base; gentle folding is essential to keep the dessert airy and light.
- Use full-fat cream cheese only. Low-fat alternatives contain too much water, which can result in a thinner, less stable mousse that won’t set properly.
- If your kitchen is warm, speed up the setting process by placing the assembled cups in the freezer for one hour before moving them to the refrigerator for final chilling.
Why We Love No-Bake Desserts
There is a certain magic reserved for desserts that bypass the scorching heat of the oven entirely. No-bake treats are the culinary equivalent of hitting the easy button; they solve dessert dilemmas faster than you can say “preheat.” They are perfect for summer parties when turning on the oven feels like an act of aggression against your air conditioning unit, or simply when patience is not your virtue. Furthermore, making a no-bake item like this ensures that even novice cooks achieve impressive, professional-looking results without the fear of burning or sinking.
When I served these Creamy No-Bake Oreo Mousse Cups – Easy Chocolate Dessert at that chaotic holiday party, everyone assumed they were sourced from a fancy patisserie, which truly justified the minimal effort involved.
Decadence Without the Drama
The secret weapon here is the texture contrast. You have the dense, buttery crunch of the cookie crust paired with the unbelievably smooth, airy chocolate mousse. It’s a sensory experience that delivers satisfaction in every single spoonful. Unlike baked cakes, which can sometimes dry out, this mousse remains wonderfully moist and chilled, making it the perfect palate cleanser after a heavy meal.
The cream cheese adds a slight tang and necessary stabilization that prevents the mousse from becoming too soft. Combined with the powdered sugar, it provides a base that is both sturdy and decadent. This isn’t just a dessert; it’s proof that the best things in life often require the least amount of complex intervention. If you can use a mixer, you can master this recipe. Forget the stress; embrace the sweet reward.
Frequently Asked Questions About Mousse Cups
How long do these mousse cups take to set?
While they achieve a good stability after 4 hours, chilling them overnight (8 hours) provides the best, firmest mousse consistency and allows the flavors to fully marry, enhancing the overall taste.
Can I make these Creamy No-Bake Oreo Mousse Cups ahead of time?
Absolutely! This is one of the best make-ahead desserts. You can prepare them completely up to two days in advance and keep them covered in the refrigerator. Just add the final garnish right before serving.
What can I use instead of heavy cream if I need a dairy-free option?
For a non-dairy alternative, you can successfully use chilled coconut cream (the thick cream layer from a can of full-fat coconut milk, chilled overnight) or a high-quality plant-based heavy whipping alternative. Ensure the product is cold to achieve proper peaks.
Can I use frozen whipped topping instead of whipping cream?
While you certainly can, using fresh, cold heavy whipping cream yields a far superior texture. Frozen whipped topping often contains stabilizers and has a slightly oilier mouthfeel that doesn’t replicate the lightness of true, homemade mousse. Stick to fresh cream for maximum fluffiness!
Why did my mousse come out runny?
Runny mousse is almost always caused by two factors: the cream was not cold enough when whipped, preventing it from reaching stiff peaks, or the cream cheese was too warm or overmixed, which can break the emulsion. Ensure both dairy components are appropriately chilled and only mix until incorporated.
The Final Verdict on this Easy Chocolate Dessert
If you need a reliable, show-stopping dessert that bypasses the complexities of baking, look no further. These individual mousse cups are rich enough to satisfy the most intense chocolate cravings yet light enough that you won’t feel overly weighed down. They are a timeless classic for a reason, perfect for dinner parties, weekend treats, or emergency chocolate consumption. Go forth and enjoy the easiest path to dessert perfection!
Conclusion for Creamy No-Bake Oreo Mousse Cups – Easy Chocolate Dessert
Forget complicated baking schedules and fussy techniques. This recipe for Creamy No-Bake Oreo Mousse Cups – Easy Chocolate Dessert proves that elegance doesn’t require an oven or endless clean-up. We successfully combined rich chocolate flavor with light, airy texture, all resting on a crunchy cookie base. Whether you need a quick weeknight treat or a stunning finale for a dinner party, these easy chocolate dessert cups deliver maximum flavor for minimal effort. Get ready to impress your friends and family with this unforgettable, chilled delicacy. It truly is the ultimate no-fuss solution to satisfy your sweet tooth!
FAQs
How long do these delightful dessert cups last in the fridge?
These individual chocolate dessert cups are excellent for making ahead, which is perfect for parties or when you simply need a quick sweet fix later. You should store your finished treats in an airtight container in the refrigerator. They generally maintain their perfect texture and creamy flavor for up to four days. If you plan to serve them later, hold off on the final garnish until just before serving. This prevents the cookie topping from getting soggy, ensuring every bite is a delightful crunch followed by smooth mousse.
Can I use full-fat cream cheese for this Creamy No-Bake Oreo Mousse Cups – Easy Chocolate Dessert recipe?
Absolutely! Using full-fat cream cheese will give your Oreo mousse an even richer, more luxurious body. The fat content helps stabilize the whipped cream, resulting in a firmer, yet still incredibly light texture. If you use a reduced-fat version, ensure your heavy whipping cream is whipped to stiff peaks before folding it in. The key to successful Creamy No-Bake Oreo Mousse Cups – Easy Chocolate Dessert is gentle folding; you want to maintain as much air as possible for that signature fluffiness.
What substitutes work best if I don’t have Oreos for the base?
If you find yourself without those classic chocolate sandwich cookies, don’t worry! This dessert is highly versatile. You can easily substitute them with graham crackers or vanilla wafer cookies mixed with melted butter for a delicious crust. If you still crave a chocolate flavor, use chocolate chip cookies instead. Remember that the base needs to be finely crushed to bind properly. If your chosen substitute is less sweet, you might consider adding a teaspoon of powdered sugar to the crust mixture before pressing it into the cups.
Can I freeze these chocolate mousse cups?
While technically possible, freezing is generally not recommended for maximum flavor and texture retention. When dairy-heavy chilled desserts thaw, they can sometimes weep or lose their signature airy consistency. If you absolutely must freeze them, consume them within a month and thaw them slowly in the refrigerator overnight. Be prepared that the cookie crust might soften slightly. For the best experience of this easy dessert, enjoy the individual servings chilled but unfrozen within a few days of preparation.

Leave a Comment