
You’ve scrolled, you’ve drooled, and you’ve definitely contemplated selling a kidney just to afford a plane ticket to hunt down that viral dessert. Stop the madness! Today, we solve the global obsession by showing you exactlyHow to Make the Decadent Dubai Chocolate Bar at Home.
This isn’t just chocolate; it’s a symphony of crunchy textures and rich, nutty flavor encased in smooth, high-quality couverture, proving that the best culinary adventures often happen right in your own kitchen.
- Achieve that signature satisfying crunch using shredded phyllo pastry combined with high-quality pistachio butter for an authentic interior texture.
- The recipe requires basic kitchen equipment and minimal baking, making this viral sensation surprisingly straightforward to prepare for any home cook.
- Create visually stunning, professional-grade bars suitable for impressive gifting or simply showcasing your newfound mastery of confectionery art.
- Easily customize the filling with alternative nut butters or different spices, offering exciting versatility beyond the traditional Dubai standard.
Ingredients for How to Make the Decadent Dubai Chocolate Bar at Home
Here’s what you’ll need to make this delicious dish:
- High-Quality Milk Chocolate (or Dark)This serves as the outer shell; always choose a couverture chocolate for better melting and shine.
- Pistachio Paste (or Butter)Essential for the vibrant green color and intense nutty flavor that defines this specific viral treat.
- Shredded Phyllo Pastry (Kunafa Dough)The key component providing the unique, crispy, and crunchy texture when lightly toasted in butter.
- Unsalted Butter or GheeUsed to toast the phyllo dough until perfectly golden brown and fragrant, enhancing its overall richness.
- Powdered Sugar (Icing Sugar)A small amount is mixed into the filling to stabilize the mixture and add a touch of sweetness without graininess.
- Cardamom PowderJust a pinch of this aromatic spice elevates the pistachio flavor, adding a traditional Middle Eastern depth.
The full ingredients list, including measurements, is provided in the recipe card directly below.
How to Make the Decadent Dubai Chocolate Bar at Home
Follow these simple steps to prepare this delicious dish:
- Step 1: Prep the Crunchy Filling BaseIn a medium skillet, melt the butter or ghee over medium heat. Add the shredded phyllo dough and toast, stirring constantly, for 5 to 7 minutes until golden and crisp. Transfer the crunchy strands to a bowl and let them cool completely.
- Step 2: Prepare the Pistachio CreamIn a separate bowl, combine the cooled crispy phyllo, pistachio paste, powdered sugar, and a pinch of cardamom powder. Mix gently until the pistachio paste evenly coats the phyllo strands, creating a thick, sticky filling mixture.
- Step 3: Temper and Mold the Outer ShellCarefully temper the chocolate according to the package directions or using a microwave method (heating in 30-second intervals until smooth). Pour about half of the melted chocolate into your bar molds, ensuring the chocolate fully coats the sides and bottom. Refrigerate for 10 minutes to set.
- Step 4: Fill and Seal the BarsSpoon the prepared pistachio and phyllo filling into the chilled chocolate shells, leaving a small border at the top. Do not overfill. Gently tap the mold on the counter to settle the filling.
- Step 5: Final Coating and SettingPour the remaining melted chocolate over the filling to seal the bar completely. Smooth the top with a spatula and return the mold to the refrigerator. Allow the bars to chill for at least 3 hours, or until the chocolate is completely hard and easily separates from the mold.
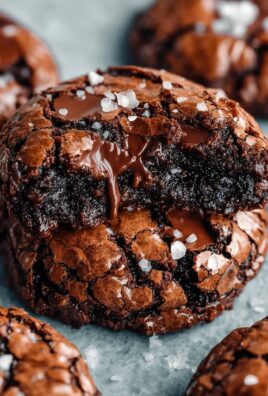
Transfer to plates and enjoy the satisfying crack of the shell followed by the explosive crunch of the filling for the perfect finishing touch.
Why This Decadent Chocolate Bar Broke the Internet
We’ve all been there: staring at our phones, mesmerized by a slow-motion video of someone carefully cracking a chocolate bar, hearing that distinctive, amplified crunch. This particular confection went viral because it offered something fundamentally new in the realm of chocolate indulgence—a genuinely complex texture. Standard chocolate bars are smooth; maybe they contain a few nuts or crisped rice. The Dubai bar, however, introduces the delicate, brittle texture of kunafa (shredded phyllo dough), traditionally used in Middle Eastern desserts, into the creamy chocolate and pistachio framework.
Before the digital explosion, few people outside specialized bakeries knew this combination existed. Once the internet saw the sheer pleasure derived from the textural contrast—the smooth snap of the shell giving way to the rich, slightly salty pistachio cream and the shatteringly crisp phyllo threads—it created a global culinary phenomenon. Getting your hands on one became a status symbol, which, naturally, only fueled demand. Thankfully,How to Make the Decadent Dubai Chocolate Bar at Homemeans bypassing the massive queues and delivery nightmares entirely, giving you bragging rights and a much fuller wallet.
Mastering the Crunch: Tips for Perfect Phyllo
The crunch is non-negotiable. If your phyllo is chewy, you’ve missed the entire point of this culinary masterpiece. The secret lies in treating the phyllo dough correctly before it meets the pistachio paste. First, ensure your phyllo is completely thawed if you stored it frozen. Shred it finely using your fingers or even a pair of kitchen scissors into small pieces. When toasting, use high-quality fat like clarified butter or ghee; the higher smoke point helps achieve crispness without burning. The heat should remain medium. Toasting takes patience—about five to seven minutes of constant stirring. Do not walk away! Phyllo goes from pale to burnt faster than you can say “pistachio.”
After toasting, the most critical step is allowing the phyllo strands to cool absolutely completely before mixing them with the pistachio paste. If you mix warm phyllo into the paste, the moisture and heat will instantly soften the threads, turning your future crunch into disappointing mush. Cooling ensures maximum structural integrity, giving you that ultimate, ear-pleasing shatter when you finally take a bite. This attention to detail separates the good bars from the truly magnificent ones.
Troubleshooting the Shell: Avoiding a Melting Disaster
A beautiful, glossy, and snappy chocolate shell is the hallmark of a professional-grade bar. This requires careful temperature control, often referred to as tempering. Tempering stabilizes the cocoa butter crystals, preventing that dull, gray streaking known as “bloom” and ensuring the chocolate snaps perfectly. If you are intimidated by traditional tempering methods, use high-quality melting wafers or compound chocolate, which are designed to melt and set easily without complex temperature curves.
However, if you choose premium couverture chocolate, follow the seeding method. Melt two-thirds of the chocolate gently, then stir in the remaining third (the “seed” chocolate) off the heat until fully melted. This brings the temperature down to the correct working range (around 88-90°F or 31-32°C for milk chocolate). Always ensure your molds are spotlessly clean and dry. Any water droplet will seize the chocolate immediately. When sealing the bar, work quickly but confidently. Pour the final layer, gently rock the mold to ensure full coverage, and then place it directly into the refrigerator—not the freezer—to set slowly and evenly, maintaining that desirable shine.
Next-Level Flavor Variations
While the classic pistachio filling is undeniably sublime, once you masterHow to Make the Decadent Dubai Chocolate Bar at Home, you possess the power to customize. The structural framework—chocolate shell plus crispy phyllo—remains, but the flavor profile is yours to command. You might substitute the pistachio butter with high-quality almond butter or even a velvety cashew paste for a milder flavor. If you prefer a nut-free filling, try using a rich seed butter like sunflower or pumpkin seed butter, adding a hint of vanilla bean paste for depth.
Spice variations also open up exciting avenues. Instead of cardamom, introduce a small amount of warm cinnamon and ginger powder for an autumnal twist, especially if you use dark chocolate for the shell. Another fascinating option is adding a teaspoon of finely shredded, caramelized coconut flakes to the filling, creating a complex tropical crunch. Remember to maintain the right ratio of crispy phyllo to creamy paste; the phyllo must dominate the texture profile to achieve the signature bite. Play with these variations to find your personal favorite iteration of this global phenomenon.
Essential Tools for Chocolate Bar Success
Making chocolate bars isn’t inherently difficult, but having the correct tools streamlines the process immensely and ensures professional results. You absolutely need high-quality silicone or polycarbonate chocolate bar molds. These are non-negotiable for easy release and a polished finish. Silicone is flexible and beginner-friendly, while polycarbonate gives the highest shine. A reliable kitchen thermometer is crucial if you attempt to temper chocolate correctly, ensuring accuracy in small increments.
Additionally, a small offset spatula is invaluable for scraping excess chocolate from the top of the mold and smoothing the back of the bar before setting. Finally, use a double boiler system or a microwave on low power for melting the chocolate. Avoid direct heat; burning the chocolate ruins the entire batch and creates an acrid taste that no amount of fancy filling can mask. Having your mise en place ready—all ingredients pre-measured and tools within reach—makes the process far less stressful and much more enjoyable. Investing in the right tools transforms a messy endeavor into a rewarding culinary experience.
FAQs About the Homemade Dubai Chocolate Bar
What if I can’t find shredded phyllo dough?
While shredded phyllo (kunafa dough) offers the most authentic texture, you can substitute it with very finely crushed vermicelli noodles. Ensure you toast these noodles thoroughly in butter until they are brittle and deeply golden brown to mimic the crispness of the traditional phyllo.
How do I store the finished chocolate bars?
Store the finished bars in an airtight container at room temperature, ideally in a cool, dark place. Avoid storing them in the refrigerator unless your house is extremely hot, as refrigeration can sometimes cause the chocolate to bloom or sweat upon removal when brought back to room temperature.
Why is my chocolate shell turning gray (blooming)?
Chocolate bloom occurs because the cocoa butter separates or sugar crystallizes, usually due to rapid temperature changes or improper tempering. Make sure you set the bars in the refrigerator, not the freezer, and try to maintain a consistent temperature when storing them. Proper tempering minimizes the chance of bloom.
Can I make a vegan version of this recipe?
Absolutely. Substitute the milk chocolate with a high-quality vegan dark chocolate or oat milk chocolate. Replace the unsalted butter with a plant-based baking stick or refined coconut oil when toasting the phyllo dough, ensuring the filling remains completely dairy-free without compromising flavor.
What is the ideal thickness for the chocolate shell?
Aim for a shell thickness of about 1/8 inch (3 mm). If the shell is too thin, it will crack and break when you unmold it. If it is too thick, the bar becomes overly dense and the filling-to-chocolate ratio will be unbalanced, diminishing the satisfying texture contrast.
Have you ever spent hours scrolling, watching food videos that make you feel like you need a passport just to taste one bite? That was me, absolutely obsessed with the legendary chocolate bar taking over social media—the one filled with crispy, nutty goodness, hailing from the luxurious city of Dubai. It seemed impossible to get unless you were willing to sell a kidney for the shipping fees or book a spontaneous flight.
Forget the chaos, the queues, and the exorbitant markups. We are bringing the gold-plated experience right into your kitchen. This isn’t just about making a chocolate bar; it’s about recreating that signature crunch and luxurious flavor profile using ingredients you can actually find. Get ready to learn preciselyHow to Make the Decadent Dubai Chocolate Bar at Home, turning a viral trend into an affordable masterpiece you can hoard—without fighting strangers at the grocery store.
The Secret Sauce: Mastering the Filling
The true magic of this famous confection lies not in the chocolate coating, but in the textural symphony hidden inside. It’s a combination of smooth, deeply aromatic pistachio cream and delightfully crunchy shredded pastry. If you skip the preparation of the filling, you miss the entire point. Think of it as the edible equivalent of a treasure chest filled with gold flakes—it needs proper construction.
Preparing the Kunafeh (Kataifi) Pastry
Kunafeh pastry, or kataifi, provides that necessary shattered crunch. You must toast it properly to maximize flavor and texture. First, gently shred the long strands into smaller, manageable pieces. Melt about two tablespoons of clarified butter (or use ghee for a richer flavor) in a large skillet over medium heat. Add the kunafeh and toast, stirring constantly, until it turns a deep golden-brown. This step requires patience; rushing it results in unevenly cooked strands.
Once toasted, immediately remove the kunafeh from the pan to cool completely. Warm kunafeh will melt your filling, creating a sad, mushy mess. We demand excellence, not mush. Transfer the toasted pastry to a bowl and ensure it is completely room temperature before proceeding to the next step.
Creating the Silky Pistachio Filling
The filling base needs to be smooth and hold the crunchy pastry without being overly sticky. You will combine high-quality pistachio butter (the runnier, unsweetened kind works best) with melted white chocolate and a touch of neutral oil if needed, to ensure maximum spreadability. We are aiming for the consistency of a thick, luxurious mousse that still pours slightly. If your mixture feels too stiff, a teaspoon of mild flavorless oil or a dollop of full-fat clotted cream can rescue it.
Stir in a generous pinch of fine sea salt—it’s crucial for cutting through the richness and elevating the nuttiness of the pistachio. Finally, fold the cooled, toasted kunafeh into this pistachio mixture. Ensure every strand is thoroughly coated with the creamy binder, ready to deliver that satisfying snap once the bar is chilled. Avoid overmixing once the pastry is added; just fold until everything is incorporated.
Essential Ingredients for Your Viral Creation
Creating a gourmet bar requires gourmet materials, but don’t panic—gourmet doesn’t always mean expensive. Choose the best chocolate you can reasonably afford, as it forms 90% of the bar’s flavor profile. Skip the waxy stuff; your hard work deserves better. The quality of the pistachio butter is also non-negotiable for achieving that authentic Dubai taste.
- For the Shell:400g high-quality milk or dark chocolate (minimum 55% cacao recommended).
- For the Pistachio Filling:200g unsweetened pistachio butter or paste.
- For the Binder:100g white chocolate (high-quality, baking-specific is best).
- For the Crunch:150g kunafeh/kataifi pastry.
- Fat for Toasting:2 tbsp clarified butter or ghee.
- Enhancements:1 tsp neutral oil (optional, for thinning), a pinch of fine sea salt.
Step-by-Step Guide: How to Make the Decadent Dubai Chocolate Bar at Home
This process demands a little precision, mainly around the tempering of the chocolate. Tempering ensures the final bar has a shiny finish, a solid structure, and that coveted clean break (the “snap”). If you skip tempering, your bars will be dull, melt quickly, and crumble—a true tragedy we must avoid.
Phase 1: Tempering the Chocolate
Tempering sounds intimidating, but it’s essentially heating and cooling the chocolate precisely to stabilize the cocoa butter crystals. Chop your milk or dark chocolate finely. Melt 300g of the chocolate over a double boiler (or in 20-second bursts in the microwave) until it reaches 45°C (113°F). Use a rubber spatula to stir frequently, ensuring even melting.
Remove the melted chocolate from the heat and stir in the remaining 100g of chopped chocolate (this is called seeding). Stir continuously until all the seed chocolate melts and the mixture cools to a working temperature of 31-32°C (88-90°F). This precise temperature range guarantees the maximum shine and stability for your finished product.
Phase 2: Building the Chocolate Shell
Using a silicone chocolate bar mold (standard sizes work well for these viral bars), spoon about one-third of your perfectly tempered chocolate into the molds. Use a small, clean pastry brush or the back of a spoon to ensure the chocolate coats the sides and corners evenly. Pay extra attention to the edges; they need to be thick enough to hold the generous filling. Place the mold in the refrigerator for just 5 minutes to allow the shell to set until firm but not brittle.
Phase 3: Filling and Sealing
Carefully spoon the prepared pistachio-kunafeh filling into the chilled chocolate shells. You should press it down lightly but do not overfill them! Always ensure you leave a small lip at the top edge of the chocolate shell so you can properly seal the bar later. Gently tap the mold on the counter to settle the filling and eliminate any air pockets that might compromise the structure.
Now, take the remaining tempered chocolate and pour it carefully over the filling to create the base (which becomes the top of the bar when flipped). Use an offset spatula to smooth the surface, ensuring a seamless seal between the shell and the base layer. You must work quickly here, as the chocolate sets up fast against the cool filling.
Return the filled and sealed molds to the refrigerator for 20 to 30 minutes. Do not freeze them, as freezing causes condensation when they warm up, potentially ruining the beautiful shine and the crucial snap. The bars are ready when they easily release from the mold with a slight flex. Congratulations, you’ve just created a viral sensation!
Perfecting the Cooking Process

To ensure efficiency and superior texture, toast the kunafeh pastry first and set it aside to cool completely. While the pastry cools, melt and combine the white chocolate and pistachio butter for the filling. Finally, focus entirely on tempering the shell chocolate just before assembly to guarantee a perfect snap.
Add Your Touch
Elevate the filling by adding a tiny sprinkle of ground cardamom or a single drop of rose water for an authentic Middle Eastern flair. For a darker twist, use hazelnut butter instead of pistachio, or incorporate crushed freeze-dried raspberries into the chocolate shell for a burst of color and tartness.
Storing & Reheating
Store your finished chocolate bars in an airtight container at cool room temperature (below 20°C) or in the refrigerator for up to two weeks. While reheating isn’t necessary, serving them slightly chilled straight from the fridge enhances the perfect, crisp texture and provides that iconic, satisfying snap.
Expert Tips for the Perfect Dubai Bar
- Always ensure the kunafeh is completely cool before mixing it into the pistachio filling, preventing the binder chocolate from softening prematurely and ruining the crucial crunch.
- Invest in an accurate kitchen thermometer for tempering; guessing the temperature results in messy, bloom-prone chocolate that lacks the essential shiny finish and snap.
- When spreading the chocolate shell, focus on building up the sides of the mold; this is critical to ensure the filling stays perfectly encased and prevents any leakage.
I remember serving these homemade bars at a recent dinner party, and the look of pure shock when guests realized the incredible filling crunch was priceless. They disappeared faster than I could offer a second piece.
Frequently Asked Questions About Making Gourmet Chocolate Bars
Do I really have to temper the chocolate?
Yes, tempering is non-negotiable for this recipe. Untempered chocolate will result in a soft, dull bar that melts instantly in your hands and won’t have the hard, audible crack that defines the viral sensation.
Can I use peanut butter instead of pistachio paste?
You can certainly swap the nut butter, but be aware that using alternatives like peanut butter or almond butter will dramatically change the flavor profile. The authentic taste comes specifically from the unique richness of the pistachio.
How long does the bar last?
When stored correctly in an airtight container away from heat, the bars will maintain their quality and crunch for up to two weeks. However, based on my personal experience, they rarely survive past the first 48 hours in a hungry household.
What if I don’t have a chocolate bar mold?
No problem! You can use a lined loaf pan or a small, shallow baking tray. Simply pour the bottom layer of chocolate, spread the filling, and cover with the final layer, then cut into bars once completely set and firm.
What is a good substitute for clarified butter when toasting the kunafeh?
Ghee is an excellent substitution for clarified butter, offering a similar high smoke point and a rich, slightly nutty flavor that complements the pistachio perfectly. Regular unsalted butter works too, but watch carefully to avoid burning the milk solids.
Conclusion for How to Make the Decadent Dubai Chocolate Bar at Home
Congratulations—you have officially unlocked the secret to the internet’s most talked-about sweet treat! While mastering the meticulous process of tempering might require a few test runs, the result is a tremendously rewarding culinary achievement. You now possess the knowledge to recreate that viral masterpiece, flawlessly blending the sleek elegance of perfectly tempered chocolate with the addictive, complex texture of the pistachio-infused crispy interior. Say goodbye to longing stares at screens; you can proudly present your own homemade, jaw-dropping confection. Go forth and share this decadent piece of confectionery art, proving that even the most exclusive, sought-after international indulgences are truly within the reach of your home kitchen.
FAQs
How to Make the Decadent Dubai Chocolate Bar at Home filling crispy and authentic?
The magic of this specific viral treat lies entirely in the texture of the filling, which should deliver an audible shatter upon biting. Authentically, you need finely shredded pastry, such as kunafa dough, lightly toasted in clarified butter until it achieves a deep golden hue and becomes extremely crisp. Once fully cooled, mix this crunch element meticulously with your stabilized pistachio cream. Ensure the pastry is entirely cold before incorporating it into the cream base, as residual heat will compromise the stability and melt the cream, preventing you from achieving that iconic, irresistible crunch when you finally break the chocolate shell.
What type of chocolate should I use to get that perfect snap, and is tempering essential?
For a truly professional-grade finish, tempering is not just helpful—it’s absolutely essential. Tempering is the process that stabilizes the cocoa butter crystals, resulting in a shiny surface, a clean release from the mold, and the famous audible “snap” when broken. Use a high-quality couverture chocolate, which has a higher percentage of cocoa butter than standard baking chips. If you skip tempering, the bar will develop unattractive white streaks (known as bloom) and melt instantly at room temperature, ruining the luxurious experience this treat promises.
Do I need specialized equipment to create this viral stuffed chocolate bar sensation?
While specialized tools certainly enhance the process, you don’t need a professional kitchen setup. Clear polycarbonate chocolate bar molds provide the cleanest, sharpest edges, but high-quality silicone bar molds or even a small loaf pan lined with parchment paper can work for your first attempts. However, the one indispensable item you must acquire is an accurate digital kitchen scale. Precision in measuring chocolate and cocoa butter during the tempering process is critical for success, ensuring the fat ratios are perfect for a flawless finish.
Once I know How to Make the Decadent Dubai Chocolate Bar at Home, how should I store it to maintain quality?
Proper storage is crucial for preserving both the chocolate’s sheen and, more importantly, the crispness of the interior filling. Always store the finished bar in an airtight container placed in a cool, dark pantry—ideally around 65°F (18°C). Avoid placing the bars in the refrigerator; the fluctuating temperatures and high moisture content will cause the chocolate to sweat and potentially turn the crispy filling soggy and stale. When stored correctly, your creation will maintain its quality and texture wonderfully for up to two weeks, if they last that long!
Leave a Comment