
Red Velvet Cake Pops: A Sweet Delight
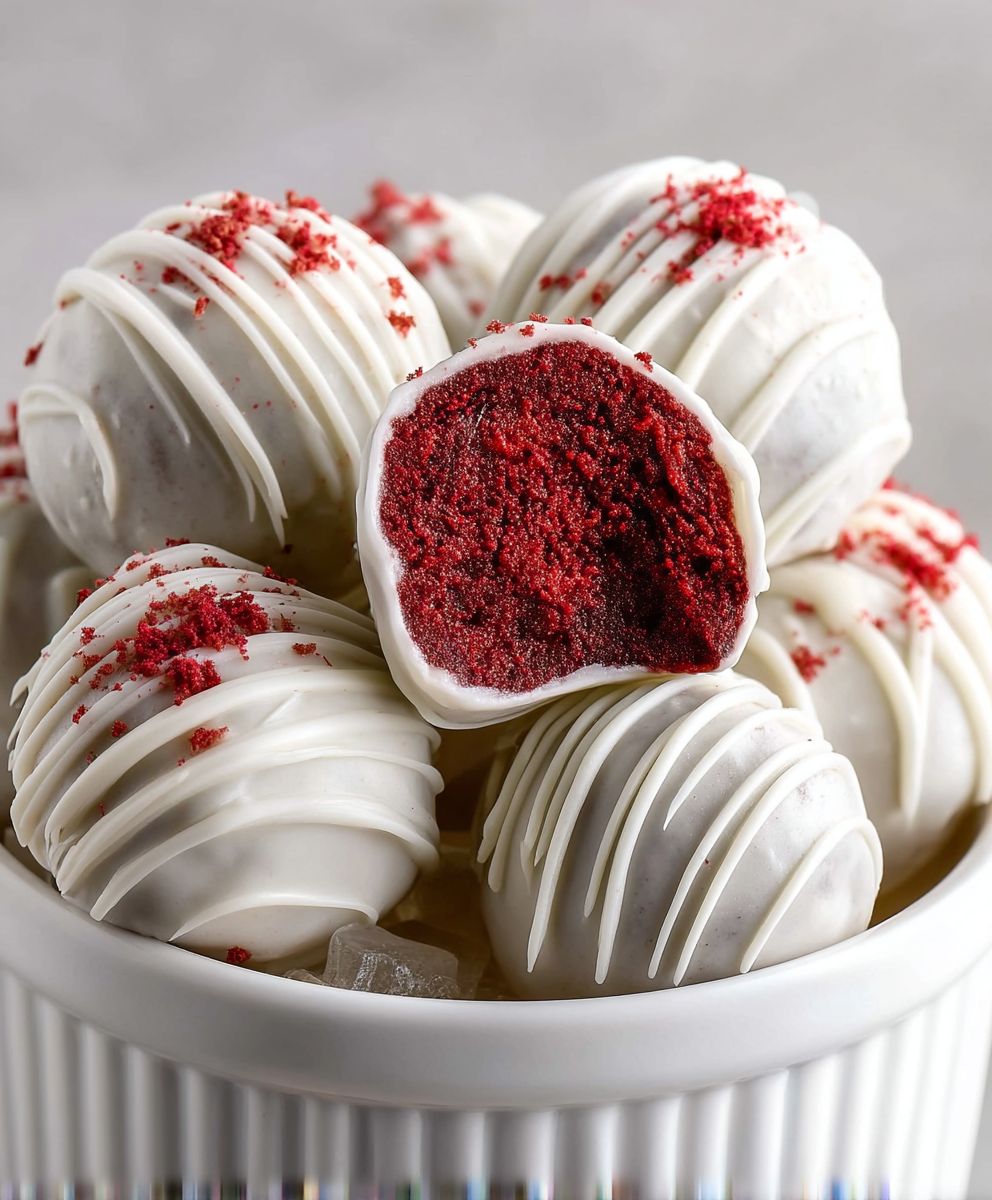
Red Velvet Cake Pops are not just a treat; they are a celebration on a stick! These delightful bites combine the rich, velvety texture of classic red velvet cake with the convenience of a pop, making them perfect for any occasion. Originating from the Southern United States, red velvet cake has a storied history that dates back to the 1800s, often associated with special celebrations and gatherings. The vibrant red color, paired with a creamy cream cheese frosting, creates a visual and taste sensation that is hard to resist.
People love Red Velvet Cake Pops for their unique flavor profile and the fun, bite-sized format. The moist cake, combined with the smooth coating, offers a delightful contrast in texture that keeps you coming back for more. Whether you’re hosting a party, celebrating a birthday, or simply indulging in a sweet treat, these cake pops are sure to impress. Join me as we dive into this delicious recipe and discover how to create your own batch of Red Velvet Cake Pops that will leave everyone asking for seconds!

Ingredients:
- 1 box of red velvet cake mix
- 3 large eggs
- 1 cup of vegetable oil
- 1 cup of water
- 1 teaspoon of vanilla extract
- 1 container (8 oz) of cream cheese frosting
- 1 cup of white chocolate chips
- 1 tablespoon of vegetable oil (for melting chocolate)
- Sprinkles or crushed nuts (for decoration)
- Wooden lollipop sticks or cake pop sticks
Preparing the Cake
- Preheat your oven to 350°F (175°C). Grease and flour a 9×13 inch baking pan or line it with parchment paper.
- In a large mixing bowl, combine the red velvet cake mix, eggs, vegetable oil, water, and vanilla extract. Use an electric mixer on medium speed for about 2 minutes until the batter is smooth and well combined.
- Pour the batter into the prepared baking pan and spread it evenly. Bake in the preheated oven for 30-35 minutes, or until a toothpick inserted into the center comes out clean.
- Once baked, remove the cake from the oven and let it cool in the pan for about 10 minutes. Then, transfer it to a wire rack to cool completely.
Making the Cake Pop Mixture
- Once the cake is completely cooled, crumble it into a large mixing bowl. You can use your hands or a fork to break it into fine crumbs.
- Add the cream cheese frosting to the crumbled cake. Mix well until the frosting is fully incorporated and the mixture is moist and holds together when pressed.
- Using your hands, scoop out about 1 tablespoon of the cake mixture and roll it into a ball. Place the balls on a baking sheet lined with parchment paper. Repeat this process until all the mixture is used up.
- Once all the cake balls are formed, place the baking sheet in the refrigerator for at least 1 hour to firm up the cake pops.
Melting the Chocolate
- In a microwave-safe bowl, combine the white chocolate chips and 1 tablespoon of vegetable oil. This will help the chocolate melt smoothly.
- Microwave the chocolate in 30-second intervals, stirring in between, until it is completely melted and smooth. Be careful not to overheat the chocolate, as it can burn easily.
Assembling the Cake Pops
- Once the cake balls are firm, remove them from the refrigerator. Dip the tip of each lollipop stick into the melted chocolate, then insert it into the center of a cake ball. This helps to secure the stick in place.
- After inserting the sticks, dip each cake pop into the melted chocolate, ensuring it is fully coated. Gently tap the stick against the edge of the bowl to remove any excess chocolate.
- Before the chocolate sets, sprinkle your choice of decorations, such as sprinkles or crushed nuts, over the cake pops for a festive touch.
- Place the finished cake pops upright in a styrofoam block or a cake pop stand to allow the chocolate to set completely. If you don’t have a stand, you can also place them back on the parchment-lined baking sheet.
Storing and Serving
- Once the chocolate has hardened, you can store the cake pops in an airtight container in the refrigerator for up to a week.
- When ready to serve, you can take them out and let them sit at room temperature for a few minutes for the best flavor and texture.
- These red velvet cake pops are perfect for parties, celebrations, or just a sweet treat to enjoy at home!
Tips for Success:
- Make sure your cake is completely cooled before crumbling it; otherwise, the mixture may become too moist.
- Experiment with different types of chocolate for coating, such as dark or milk chocolate, for a different flavor profile.
- If you want to add a little extra flavor, consider mixing in a teaspoon of
Conclusion:
If you’re looking for a delightful treat that combines the rich, velvety flavor of red velvet cake with the fun and portability of cake pops, then this recipe for Red Velvet Cake Pops is an absolute must-try! These little bites of joy are not only visually stunning with their vibrant red color and creamy white coating, but they also deliver a deliciously moist and flavorful experience that will leave your taste buds dancing. Whether you’re preparing for a special occasion, a holiday gathering, or simply want to indulge in a sweet treat, these cake pops are sure to impress.
When it comes to serving suggestions, the possibilities are endless! You can present your Red Velvet Cake Pops on a decorative cake stand for a stunning centerpiece at parties or wrap them individually in clear cellophane bags tied with a ribbon for a charming party favor. For an extra touch of creativity, consider drizzling some melted white chocolate or even dark chocolate over the pops for a beautiful contrast. You can also sprinkle them with festive decorations like edible glitter or colored sprinkles to match the theme of your event.
If you’re feeling adventurous, why not try some variations? You can experiment with different coatings, such as milk chocolate or even a candy melt in a different color. For a unique twist, consider adding a hint of flavor to the cake mix, like almond or coconut extract, to elevate the taste profile. You could also incorporate cream cheese frosting into the mix for an extra layer of creaminess. The versatility of these cake pops allows you to customize them to your liking, making them perfect for any occasion.
I encourage you to give this Red Velvet Cake Pops recipe a try! It’s a fun and engaging way to spend time in the kitchen, and the end result is sure to bring smiles to everyone who gets to enjoy them. Don’t forget to share your experience with friends and family, and let them know how much fun you had making these delightful treats. You can even share your creations on social media—tagging your posts with #RedVelvetCakePops to inspire others to join in on the fun!
So roll up your sleeves, gather your ingredients, and dive into the world of cake pops. I promise you won’t regret it, and your taste buds will thank you for this delicious adventure! Happy baking!
Red Velvet Cake Pops: A Deliciously Easy Recipe to Try Today
Indulge in these delightful Red Velvet Cake Pops, featuring moist red velvet cake mixed with creamy frosting and coated in smooth white chocolate. Perfect for celebrations or a sweet snack at home, these visually appealing treats are sure to impress!
Ingredients
- 1 box of red velvet cake mix
- 3 large eggs
- 1 cup of vegetable oil
- 1 cup of water
- 1 teaspoon of vanilla extract
- 1 container (8 oz) of cream cheese frosting
- 1 cup of white chocolate chips
- 1 tablespoon of vegetable oil (for melting chocolate)
- Sprinkles or crushed nuts (for decoration)
- Wooden lollipop sticks or cake pop sticks
Instructions
- Preheat your oven to 350°F (175°C). Grease and flour a 9×13 inch baking pan or line it with parchment paper.
- In a large mixing bowl, combine the red velvet cake mix, eggs, vegetable oil, water, and vanilla extract. Use an electric mixer on medium speed for about 2 minutes until the batter is smooth and well combined.
- Pour the batter into the prepared baking pan and spread it evenly. Bake in the preheated oven for 30-35 minutes, or until a toothpick inserted into the center comes out clean.
- Once baked, remove the cake from the oven and let it cool in the pan for about 10 minutes. Then, transfer it to a wire rack to cool completely.
- Once the cake is completely cooled, crumble it into a large mixing bowl. You can use your hands or a fork to break it into fine crumbs.
- Add the cream cheese frosting to the crumbled cake. Mix well until the frosting is fully incorporated and the mixture is moist and holds together when pressed.
- Using your hands, scoop out about 1 tablespoon of the cake mixture and roll it into a ball. Place the balls on a baking sheet lined with parchment paper. Repeat this process until all the mixture is used up.
- Once all the cake balls are formed, place the baking sheet in the refrigerator for at least 1 hour to firm up the cake pops.
- In a microwave-safe bowl, combine the white chocolate chips and 1 tablespoon of vegetable oil. This will help the chocolate melt smoothly.
- Microwave the chocolate in 30-second intervals, stirring in between, until it is completely melted and smooth. Be careful not to overheat the chocolate, as it can burn easily.
- Once the cake balls are firm, remove them from the refrigerator. Dip the tip of each lollipop stick into the melted chocolate, then insert it into the center of a cake ball. This helps to secure the stick in place.
- After inserting the sticks, dip each cake pop into the melted chocolate, ensuring it is fully coated. Gently tap the stick against the edge of the bowl to remove any excess chocolate.
- Before the chocolate sets, sprinkle your choice of decorations, such as sprinkles or crushed nuts, over the cake pops for a festive touch.
- Place the finished cake pops upright in a styrofoam block or a cake pop stand to allow the chocolate to set completely. If you don’t have a stand, you can also place them back on the parchment-lined baking sheet.
- Once the chocolate has hardened, you can store the cake pops in an airtight container in the refrigerator for up to a week.
- When ready to serve, you can take them out and let them sit at room temperature for a few minutes for the best flavor and texture.
- These red velvet cake pops are perfect for parties, celebrations, or just a sweet treat to enjoy at home!
Notes
- Make sure your cake is completely cooled before crumbling it; otherwise, the mixture may become too moist.
- Experiment with different types of chocolate for coating, such as dark or milk chocolate, for a different flavor profile.
- If you want to add a little extra flavor, consider mixing in a teaspoon of your favorite extract.


Leave a Comment