
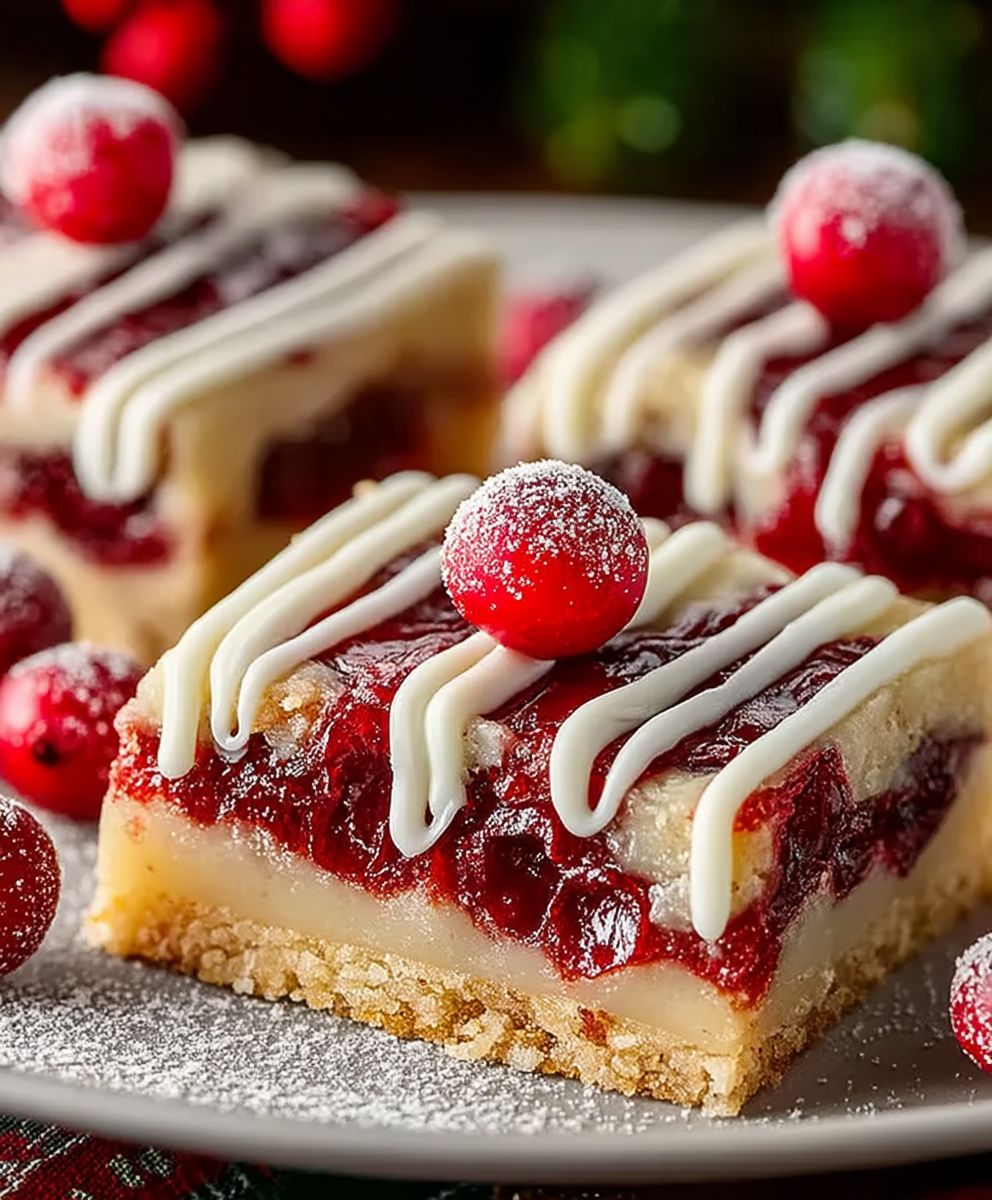
Ruby Red Cherry Bars: A Sweet Slice of Delight
Ruby Red Cherry Bars are not just a dessert; they are a celebration of flavor and nostalgia. With their vibrant color and luscious cherry filling, these bars are sure to catch your eye and tantalize your taste buds. Originating from classic American baking traditions, these delightful treats have been a staple at family gatherings and potlucks for generations. The combination of a buttery crust and a sweet, tangy cherry filling creates a perfect balance that keeps everyone coming back for more.
People love Ruby Red Cherry Bars for their irresistible taste and easy preparation. Whether you’re a seasoned baker or a novice in the kitchen, this recipe is straightforward and rewarding. The chewy texture of the bars paired with the juicy cherries makes for a delightful experience in every bite. Plus, they are perfect for any occasion, from summer picnics to cozy winter gatherings. Join me as we dive into the world of Ruby Red Cherry Bars and discover how to make this beloved treat in your own kitchen!

Ingredients:
- 1 cup all-purpose flour
- 1/2 cup granulated sugar
- 1/4 teaspoon salt
- 1/2 cup unsalted butter, softened
- 1 large egg
- 1 teaspoon vanilla extract
- 1 cup cherry pie filling (or fresh cherries, pitted and chopped)
- 1/2 teaspoon almond extract
- 1/4 cup powdered sugar (for dusting)
Preparing the Base
- Preheat your oven to 350°F (175°C). Grease an 8-inch square baking pan or line it with parchment paper for easy removal.
- In a medium mixing bowl, combine 1 cup of all-purpose flour, 1/2 cup of granulated sugar, and 1/4 teaspoon of salt. Mix these dry ingredients together until well combined.
- Add 1/2 cup of softened unsalted butter to the dry mixture. Using a pastry cutter or your fingers, blend the butter into the flour mixture until it resembles coarse crumbs.
- In a separate small bowl, whisk together 1 large egg and 1 teaspoon of vanilla extract. Pour this mixture into the flour and butter mixture, stirring until just combined. Be careful not to overmix; you want a soft dough.
- Press about two-thirds of the dough into the bottom of the prepared baking pan, creating an even layer. This will be the base of your cherry bars.
Preparing the Cherry Filling
- In a small bowl, combine 1 cup of cherry pie filling (or your fresh cherries) with 1/2 teaspoon of almond extract. If you’re using fresh cherries, you may want to add a tablespoon of sugar to sweeten them slightly.
- Spread the cherry filling evenly over the pressed dough in the baking pan. Make sure to cover the entire surface for even flavor in every bite.
Creating the Topping
- Take the remaining dough that you set aside and crumble it over the cherry filling. This will create a nice topping that will bake into a delicious crust.
- Make sure to sprinkle the crumbles evenly across the cherry filling, leaving some gaps for the cherries to peek through. This will allow the filling to bubble up and create a beautiful texture.
Baking the Bars
- Place the baking pan in the preheated oven and bake for 30-35 minutes, or until the top is golden brown and the filling is bubbly.
- Once baked, remove the pan from the oven and allow it to cool in the pan for about 10-15 minutes. This will help the bars set up a bit more before cutting.
- After cooling, carefully lift the bars out of the pan using the parchment paper (if used) and place them on a wire rack to cool completely.
Serving the Ruby Red Cherry Bars
- Once the bars are completely cool, use a sharp knife to cut them into squares or rectangles, depending on your preference.
- Dust the tops of the bars with 1/4 cup of powdered sugar for a lovely finishing touch. This adds a nice sweetness and makes them look even more appealing.
- Serve the Ruby Red Cherry Bars on a platter or individual plates. They are perfect for a dessert table, a picnic, or just a sweet treat at home.
Storage Tips
- If you have any leftovers (which is rare because they are so delicious!), store the bars in an airtight container at room temperature for up to 3 days.
- For longer storage, you can refrigerate them for up to a week or freeze them for up to 3 months. Just make sure to wrap them tightly in plastic wrap and then place them in a freezer-safe container.
Variations and Additions
If you want to get creative with your Ruby Red Cherry Bars, here are a few variations you can try:
- Chocolate Chips: Add 1/2 cup of chocolate chips to
Conclusion:
If you’re looking for a delightful dessert that combines the tartness of cherries with a sweet, buttery crust, then these Ruby Red Cherry Bars are an absolute must-try! The vibrant color and rich flavor of the cherries not only make these bars visually appealing but also create a deliciously satisfying treat that’s perfect for any occasion. Whether you’re hosting a summer picnic, celebrating a birthday, or simply indulging in a sweet craving, these bars are sure to impress your family and friends.
One of the best things about Ruby Red Cherry Bars is their versatility. You can serve them warm with a scoop of vanilla ice cream for a comforting dessert, or enjoy them chilled with a dollop of whipped cream for a refreshing treat. For an extra touch, consider drizzling a bit of chocolate sauce over the top or sprinkling some crushed nuts for added texture. If you want to experiment, try swapping out the cherries for other fruits like blueberries or raspberries, or even mix in some chocolate chips for a decadent twist. The possibilities are endless, and each variation can bring a new flavor profile to this already delightful recipe.
I encourage you to give these Ruby Red Cherry Bars a try! They are not only easy to make but also a fantastic way to showcase the deliciousness of fresh cherries. Plus, the satisfaction of cutting into a perfectly baked bar and seeing that beautiful ruby red filling is truly rewarding. Once you’ve made them, I would love to hear about your experience! Did you stick to the original recipe, or did you try a fun variation? Share your thoughts and any tips you might have in the comments below or on social media.
Remember, baking is all about creativity and having fun in the kitchen, so don’t hesitate to make this recipe your own. I can’t wait for you to experience the joy of these Ruby Red Cherry Bars, and I’m sure they will become a favorite in your household just as they have in mine. Happy baking!
Ruby Red Cherry Bars: A Deliciously Easy Recipe to Try Today
Indulge in these delightful Ruby Red Cherry Bars, featuring a buttery crust, sweet cherry filling, and a crumbly topping. Perfect for any occasion, these bars are sure to satisfy your sweet tooth!
Ingredients
- 1 cup all-purpose flour
- 1/2 cup granulated sugar
- 1/4 teaspoon salt
- 1/2 cup unsalted butter, softened
- 1 large egg
- 1 teaspoon vanilla extract
- 1 cup cherry pie filling (or fresh cherries, pitted and chopped)
- 1/2 teaspoon almond extract
- 1/4 cup powdered sugar (for dusting)
Instructions
- Preheat your oven to 350°F (175°C). Grease an 8-inch square baking pan or line it with parchment paper for easy removal.
- In a medium mixing bowl, combine 1 cup of all-purpose flour, 1/2 cup of granulated sugar, and 1/4 teaspoon of salt. Mix these dry ingredients together until well combined.
- Add 1/2 cup of softened unsalted butter to the dry mixture. Using a pastry cutter or your fingers, blend the butter into the flour mixture until it resembles coarse crumbs.
- In a separate small bowl, whisk together 1 large egg and 1 teaspoon of vanilla extract. Pour this mixture into the flour and butter mixture, stirring until just combined. Be careful not to overmix; you want a soft dough.
- Press about two-thirds of the dough into the bottom of the prepared baking pan, creating an even layer. This will be the base of your cherry bars.
- In a small bowl, combine 1 cup of cherry pie filling (or your fresh cherries) with 1/2 teaspoon of almond extract. If you’re using fresh cherries, you may want to add a tablespoon of sugar to sweeten them slightly.
- Spread the cherry filling evenly over the pressed dough in the baking pan. Make sure to cover the entire surface for even flavor in every bite.
- Take the remaining dough that you set aside and crumble it over the cherry filling. This will create a nice topping that will bake into a delicious crust.
- Make sure to sprinkle the crumbles evenly across the cherry filling, leaving some gaps for the cherries to peek through. This will allow the filling to bubble up and create a beautiful texture.
- Place the baking pan in the preheated oven and bake for 30-35 minutes, or until the top is golden brown and the filling is bubbly.
- Once baked, remove the pan from the oven and allow it to cool in the pan for about 10-15 minutes. This will help the bars set up a bit more before cutting.
- After cooling, carefully lift the bars out of the pan using the parchment paper (if used) and place them on a wire rack to cool completely.
- Once the bars are completely cool, use a sharp knife to cut them into squares or rectangles, depending on your preference.
- Dust the tops of the bars with 1/4 cup of powdered sugar for a lovely finishing touch. This adds a nice sweetness and makes them look even more appealing.
- Serve the Ruby Red Cherry Bars on a platter or individual plates. They are perfect for a dessert table, a picnic, or just a sweet treat at home.
Notes
- If you have any leftovers, store the bars in an airtight container at room temperature for up to 3 days.
- For longer storage, refrigerate them for up to a week or freeze them for up to 3 months. Just make sure to wrap them tightly in plastic wrap and then place them in a freezer-safe container.

Leave a Comment