
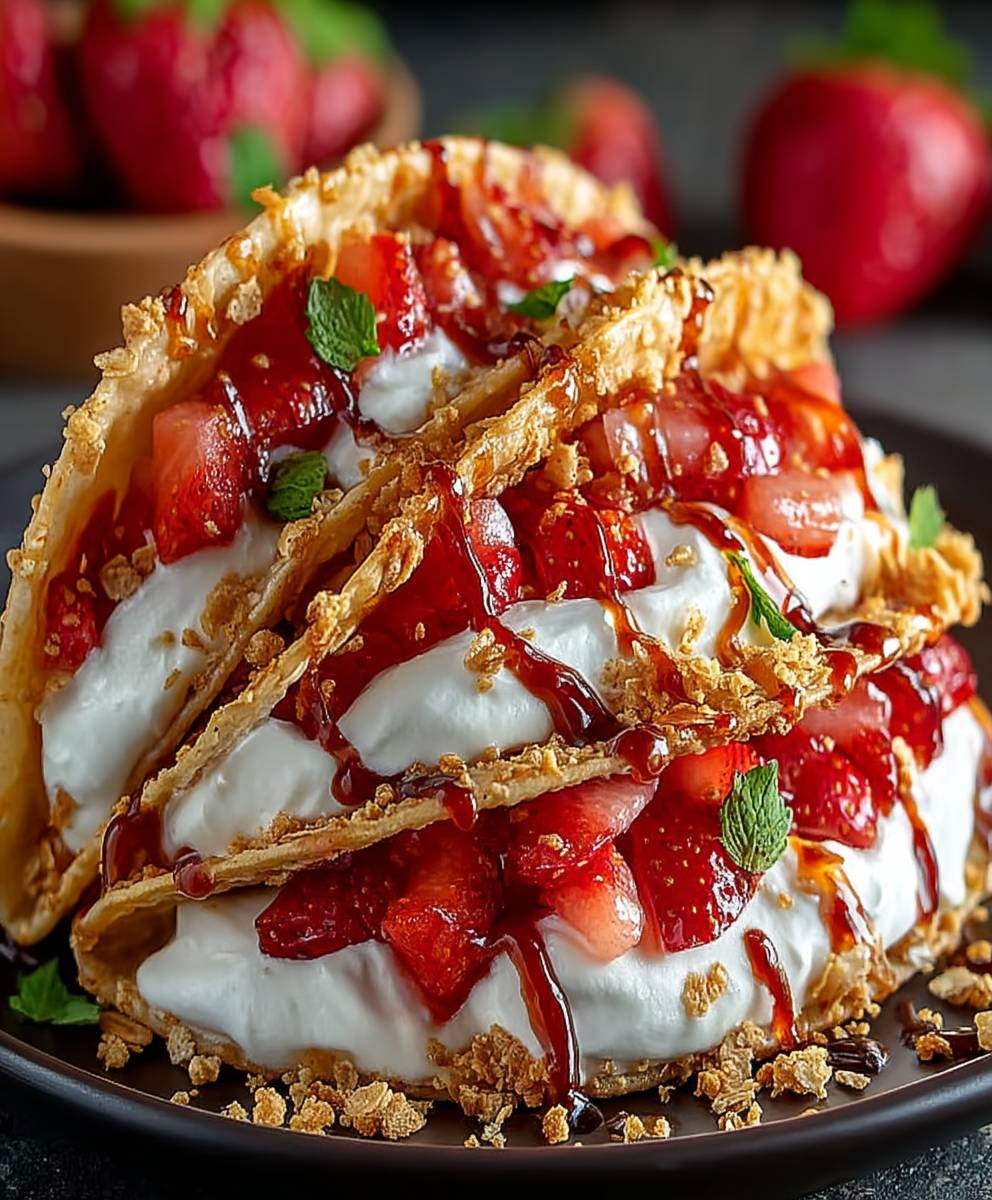
Strawberry Crunch Cheesecake Tacos: A Delightful Twist on a Classic Dessert
Strawberry Crunch Cheesecake Tacos are a delightful fusion of flavors and textures that will tantalize your taste buds. Imagine the creamy richness of cheesecake enveloped in a crispy taco shell, topped with a vibrant strawberry crunch that adds a burst of sweetness. This innovative dessert not only looks stunning but also brings a playful twist to traditional cheesecake, making it a favorite among both kids and adults alike.
The origins of cheesecake can be traced back to ancient Greece, where it was served to athletes during the first Olympic Games. Over the centuries, this beloved dessert has evolved, and today, we celebrate it in countless forms. The Strawberry Crunch Cheesecake Tacos take this classic to new heights, combining the beloved flavors of strawberry shortcake with the convenience of a handheld treat.
People love this dish for its perfect balance of creamy and crunchy textures, along with the fresh, fruity flavor of strawberries. Whether you’re hosting a summer gathering or simply indulging in a sweet craving, these tacos are sure to impress. So, let’s dive into this delicious recipe and discover how to create your own Strawberry Crunch Cheesecake Tacos!

Ingredients:
- For the Cheesecake Filling:
- 16 oz cream cheese, softened
- 1 cup powdered sugar
- 1 tsp vanilla extract
- 1 cup heavy whipping cream
- For the Strawberry Crunch Topping:
- 1 cup freeze-dried strawberries
- 1 cup crushed graham crackers
- 1/4 cup granulated sugar
- 1/4 cup unsalted butter, melted
- For the Taco Shells:
- 8 small flour tortillas
- 1/4 cup granulated sugar
- 1 tsp cinnamon
- Cooking spray or oil for frying
Preparing the Cheesecake Filling
- In a large mixing bowl, add the softened cream cheese. Using an electric mixer, beat the cream cheese on medium speed until it is smooth and creamy, about 2-3 minutes.
- Gradually add the powdered sugar and continue to mix until fully incorporated and there are no lumps, about 1-2 minutes.
- Mix in the vanilla extract until well combined.
- In a separate bowl, whip the heavy cream until stiff peaks form. This should take about 3-5 minutes with an electric mixer on high speed.
- Gently fold the whipped cream into the cream cheese mixture using a spatula. Be careful not to deflate the whipped cream; you want to keep the filling light and airy.
- Once combined, cover the bowl with plastic wrap and refrigerate the cheesecake filling for at least 30 minutes to firm up.
Making the Strawberry Crunch Topping
- In a food processor, add the freeze-dried strawberries and pulse until they are finely crushed. You want a powdery consistency.
- In a medium bowl, combine the crushed freeze-dried strawberries, crushed graham crackers, granulated sugar, and melted butter. Mix until everything is well combined and resembles wet sand.
- Set the strawberry crunch topping aside while you prepare the taco shells.
Preparing the Taco Shells
- In a small bowl, mix together the granulated sugar and cinnamon. Set aside.
- Heat a large skillet over medium heat and add a small amount of cooking spray or oil to coat the bottom of the pan.
- One at a time, place a flour tortilla in the skillet. Cook for about 30 seconds on one side until it starts to puff up slightly.
- Using a spatula, flip the tortilla and cook for another 30 seconds. While it’s cooking, use the spatula to gently fold the tortilla in half, creating a taco shape. Hold it in place for a few seconds until it holds its shape.
- Remove the taco shell from the skillet and place it on a paper towel to drain any excess oil. Repeat this process with the remaining tortillas.
- While the taco shells are still warm, sprinkle the cinnamon-sugar mixture inside and outside of each shell for added flavor.
Assembling the Strawberry Crunch Cheesecake Tacos
- Once the cheesecake filling has chilled and the taco shells are ready, it’s time to assemble the tacos.
- Using a piping bag or a spoon, fill each taco shell with the cheesecake filling. Be generous, but don’t overfill them to avoid spillage.
- After filling the tacos, sprinkle a generous amount of the strawberry crunch topping over the cheesecake filling in each taco.
- If desired, you can add fresh strawberry slices on top for an extra touch of freshness and color.
- Serve the strawberry crunch cheesecake tacos immediately for the best texture, or refrigerate them for up to 2 hours before serving. If refrigerating, add the strawberry crunch topping just before serving to keep it crunchy.
Tips for Success
- Make sure your cream cheese is at room temperature for
Conclusion:
In conclusion, the Strawberry Crunch Cheesecake Tacos are an absolute must-try for anyone looking to impress their friends and family with a unique dessert that combines the best of both worlds: the creamy richness of cheesecake and the delightful crunch of a taco shell. This recipe not only tantalizes your taste buds but also brings a fun and playful twist to traditional desserts, making it perfect for any occasion, from birthday parties to casual get-togethers.
One of the best aspects of this recipe is its versatility. You can easily customize the filling by incorporating different fruits like blueberries, raspberries, or even a mix of tropical flavors such as mango and pineapple. If you’re feeling adventurous, consider adding a splash of flavored liqueur to the cheesecake mixture for an adult twist. For those who prefer a healthier option, you can substitute the cream cheese with Greek yogurt, which will still provide that creamy texture while cutting down on calories. Additionally, you can experiment with various toppings, such as crushed nuts, chocolate drizzle, or even a dollop of whipped cream to elevate your dessert to the next level.
When it comes to serving suggestions, I recommend presenting these delightful tacos on a colorful platter, garnished with fresh strawberries and mint leaves for a pop of color. They are best enjoyed chilled, so make sure to refrigerate them for a bit before serving. You can also pair them with a scoop of vanilla ice cream or a refreshing sorbet for an extra indulgent treat. Trust me, your guests will be raving about these tacos long after the last bite!
I encourage you to try making these Strawberry Crunch Cheesecake Tacos in your own kitchen. The process is simple and fun, and the end result is nothing short of spectacular. Don’t forget to share your experience with friends and family, and let them know how much you enjoyed this delightful recipe. Whether you’re a seasoned baker or a novice in the kitchen, I assure you that this dessert will become a favorite in your household. So roll up your sleeves, gather your ingredients, and get ready to create a dessert that will leave everyone asking for seconds!
Strawberry Crunch Cheesecake Tacos: A Delicious Twist on Dessert
Enjoy a fun twist on dessert with these Strawberry Crunch Cheesecake Tacos, featuring a creamy cheesecake filling in crispy, cinnamon-sugar dusted taco shells, topped with a crunchy strawberry mixture. Perfect for satisfying your sweet tooth!
Ingredients
- 16 oz cream cheese, softened
- 1 cup powdered sugar
- 1 tsp vanilla extract
- 1 cup heavy whipping cream
- 1 cup freeze-dried strawberries
- 1 cup crushed graham crackers
- 1/4 cup granulated sugar
- 1/4 cup unsalted butter, melted
- 8 small flour tortillas
- 1/4 cup granulated sugar
- 1 tsp cinnamon
- Cooking spray or oil for frying
Instructions
- In einer großen Schüssel die weiche Frischkäse hinzufügen. Mit einem elektrischen Mixer den Frischkäse bei mittlerer Geschwindigkeit 2-3 Minuten lang glatt und cremig schlagen.
- Den Puderzucker nach und nach hinzufügen und weiter mixen, bis alles gut vermischt ist und keine Klumpen mehr vorhanden sind, etwa 1-2 Minuten.
- Den Vanilleextrakt unterrühren, bis alles gut kombiniert ist.
- In einer separaten Schüssel die Schlagsahne steif schlagen, etwa 3-5 Minuten mit einem elektrischen Mixer auf hoher Geschwindigkeit.
- Die Schlagsahne vorsichtig mit einem Spatel unter die Frischkäsemasse heben, dabei darauf achten, die Schlagsahne nicht zu entlüften.
- Die Schüssel mit Frischhaltefolie abdecken und die Frischkäsefüllung mindestens 30 Minuten im Kühlschrank fest werden lassen.
- In einer Küchenmaschine die gefriergetrockneten Erdbeeren hinzufügen und pulsieren, bis sie fein zermahlen sind und eine pulverartige Konsistenz haben.
- In einer mittelgroßen Schüssel die zermahlenen gefriergetrockneten Erdbeeren, die zerdrückten Graham-Cracker, den Zucker und die geschmolzene Butter vermengen. Gut mischen, bis alles gut kombiniert ist und die Mischung wie nasser Sand aussieht.
- Die Erdbeer-Crunch-Topping-Mischung beiseite stellen, während die Taco-Schalen zubereitet werden.
- In einer kleinen Schüssel den Zucker und Zimt vermengen. Beiseite stellen.
- Eine große Pfanne bei mittlerer Hitze erhitzen und eine kleine Menge Kochspray oder Öl hinzufügen, um den Boden der Pfanne zu beschichten.
- Eine Tortilla nacheinander in die Pfanne legen. Etwa 30 Sekunden auf einer Seite kochen, bis sie leicht aufgeht.
- Die Tortilla umdrehen und weitere 30 Sekunden kochen. Während sie kocht, die Tortilla vorsichtig in der Mitte falten, um eine Taco-Form zu erstellen. Einige Sekunden lang in dieser Position halten, bis sie ihre Form behält.
- Die Taco-Schale aus der Pfanne nehmen und auf ein Papiertuch legen, um überschüssiges Öl abtropfen zu lassen. Mit den restlichen Tortillas wiederholen.
- Während die Taco-Schalen noch warm sind, die Zimt-Zucker-Mischung innen und außen auf jede Schale streuen.
- Sobald die Frischkäsefüllung gekühlt ist und die Taco-Schalen bereit sind, die Tacos zusammenstellen.
- Mit einem Spritzbeutel oder einem Löffel jede Taco-Schale mit der Frischkäsefüllung füllen, großzügig, aber ohne zu überfüllen.
- Eine großzügige Menge der Erdbeer-Crunch-Topping-Mischung über die Frischkäsefüllung in jedem Taco streuen.
- Optional frische Erdbeerscheiben oben hinzufügen für zusätzliche Frische und Farbe.
- Sofort servieren für die beste Textur oder bis zu 2 Stunden vor dem Servieren im Kühlschrank aufbewahren. Wenn Sie kühlen, die Erdbeer-Crunch-Topping-Mischung kurz vor dem Servieren hinzufügen, um sie knusprig zu halten.
Notes
- Ensure your cream cheese is at room temperature for easier mixing.
- For a fun presentation, consider garnishing with fresh mint leaves.

Leave a Comment